Opnsense High(er) Availability
Why virtualize my router? #
I ditched my Asus w/merlin router more than a year ago and started using an opnsense VM on one of my Proxmox hosts. It has been pretty awesome! It comes packed with an insane amount of features that really come in handy for the homelab. Mine has been trucking along in a little 4-cpu 4GB VM doing packet inspection with Zenarmor, caching http with squid proxy (linux/windows updates!), taking zfs snapshots of itself after configuration changes, and so much more. Now I just use the old Asus routers in access point mode for wifi.
The bad #
The only downside to virtualizing the router/firewall is that homelab tinkering can then knock the internet out for everybody else in the house. Rebooting the proxmox host for updates, moving hardware around, or changing configurations will inconvenience everyone. It's all fun and games until the living room TV stops streaming!
When I originally created the VM, I was using two physical interfaces on that Proxmox host: a 10gbe nic connected to switch for LAN and a 2.5gbe nic with cable modem plugged into it for WAN. This setup prevented me from being able to migrate the router VM to a different host if I needed to bring that machine down for any reason.
Fixing the bad #
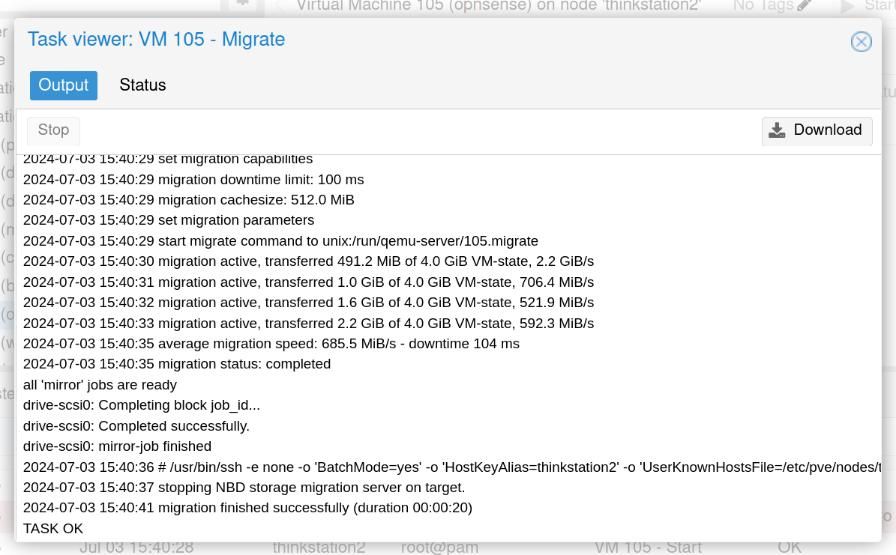
In a router-on-a-stick configuration, the WAN and LAN virtual interfaces are on separate vlans but share the physical port (or linux bridge in Proxmox), making it super easy to migrate the router VM to any other machine in the cluster. The Proxmox hosts are connected to the switch via 10 gig sfp dac and the opnsense VM gets replicated to the other hosts every 30 mins, so the switchover between them happens nearly instantly. It's so quick that our TVs continue streaming without a hiccup. I was even able to migrate the VM between hosts in the middle of a speedtest.net run!
Opnsense has high availability built-in as well, but it is fairly complicated -- requiring multiple VMs with multiple interfaces for each. Using vlans instead, you can just use the high availability feature built-in to your hypervisor to accomplish this much easier.
Basic steps for Proxmox #
- Plug the cable modem into a managed switch port
- Configure that port as untagged and give it a vlan
- Tag ports used by proxmox hosts with that vlan
- In proxmox, click node -> network -> interface -> enable vlan aware
- In proxmox, opnsense VM hardware settings -> tag wan interface with vlan
Details #
Topology #
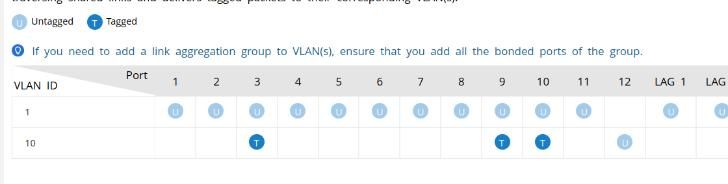
This requires a managed switch with vlans. Plug the cable modem into one of the switch ports, enter the switch admin console, and select a vlan for that port (10, for example) and leave it untagged. Next, configure the ports that your Proxmox hosts are plugged into as tagged on the vlan you selected and untagged on the default or LAN vlan.
In this screenshot, my modem is plugged into port 12 and my Proxmox hosts are plugged into ports 3, 9, and 10:
Proxmox config #
Under each node's network settings, select your bridge (vmbr0) and check the "vlan aware" box. That's all you have to do here.
Opnsense VM Config #
Two virtual network interfaces need to be added to the VM (click the vm -> hardware -> add). For Bridge, select the your vlan-aware bridge (vmbr0). The first interface should be untagged (or tagged with your LAN vlan). The second interface should be tagged with your WAN vlan.
For example:
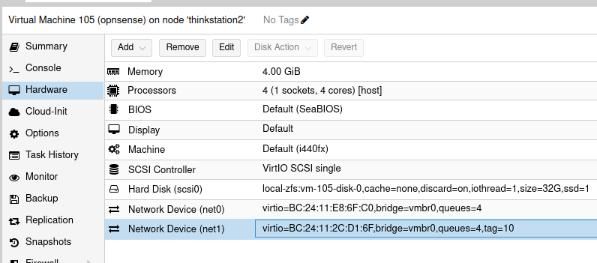
In opnsense admin console, go to Interfaces -> add interface for LAN and WAN, select the appropriate virtual adapter for each.
Proxmox Migrations #
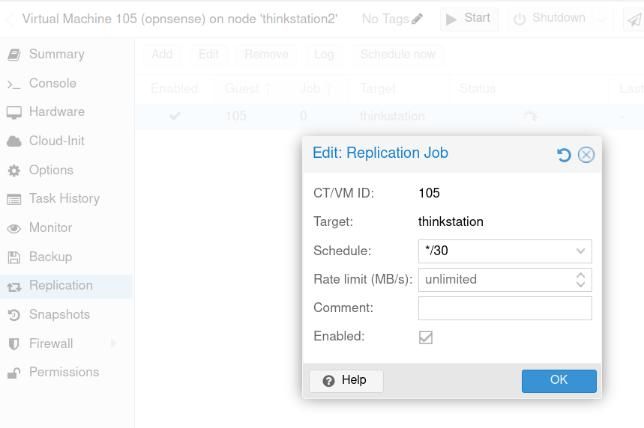
In order to migrate, the nodes must have a shared storage. You can also use a local storage, provided it is the same name and type across each node (no mixing local-lvm + local-zfs). In order to avoid copying the entire VM disk for each migrate, you'll want to go to the VM settings and set up a replication job on a somewhat frequent basis. Proxmox can then do a super fast incremental update to the VM disk and then just copy the VM's memory contents. If your VM has 4GB ram, for example, the migrate will only need to transfer 4GB if you've replicated the disk.
Replication example:
High availability can now be configured under Datacenter -> High Availability. Or, you can enjoy the live-migrate functionality as-needed, without configuring HA.
it's really fast! #
Happy homelabbing! #
- Previous: OpenVPN inside LXC container
- Next: Christmas homelab update